How to Estimate Drywall and Framing on a Commercial Floor Plan
Quick Answer: How Do You Estimate Drywall and Framing From a Commercial Floor Plan?
To estimate drywall and framing on a commercial floor plan, start by identifying every wall type, measuring the linear footage of each wall, confirming wall heights, calculating drywall square footage, estimating studs and track, adjusting for openings, and adding accessories, waste, labor, and scope notes.
The basic process is:
- Review the architectural floor plans, wall type schedule, reflected ceiling plans, sections, and specifications.
- Identify every partition type on the plan.
- Measure wall lengths by wall type.
- Confirm each wall height.
- Calculate drywall area by side and layer.
- Estimate metal studs, top track, bottom track, headers, jambs, and backing.
- Add drywall sheets, screws, tape, joint compound, corner bead, insulation, and control joints.
- Apply waste and labor production rates.
- Review addenda, alternates, exclusions, and scope gaps.
- Convert the takeoff into a bid-ready estimate.
For a broader takeoff workflow, see Quotr’s guide on how to do construction takeoff from a PDF blueprint and the full construction takeoff guide.
Why Drywall and Framing Estimates Are Easy to Get Wrong
Drywall and framing are detail-heavy scopes in commercial construction. A missed partition type or wall height can affect framing, drywall board, insulation, firestopping, finishing, labor, equipment, and schedule.
Commercial drawings often include:
- Standard interior partitions
- Fire-rated partitions
- Sound-rated walls
- Shaft walls
- Demising walls
- Corridor walls
- Furred walls
- Restroom partitions
- High walls
- Walls to deck
- Soffits and bulkheads
- Specialty board conditions
- Backing for casework, handrails, TVs, and equipment
The biggest mistake is estimating from the floor plan alone. The floor plan shows where the walls are, but the wall schedule, sections, reflected ceiling plans, and specs explain what those walls actually are.
If you are building a full bid workflow, this connects directly to Quotr’s article on how to bid commercial construction projects as a subcontractor.
What Drawings Do You Need for a Drywall and Framing Estimate?
Before starting the takeoff, collect the full drawing set and review the documents that control the drywall and framing scope.
| Drawing or Document | Why It Matters |
|---|---|
| Architectural floor plans | Show wall locations and partition tags |
| Wall type schedule | Defines stud size, board layers, rating, insulation, and wall height |
| Reflected ceiling plans | Help confirm ceiling heights, soffits, and full-height walls |
| Door schedule | Helps count openings, rated frames, and jamb conditions |
| Window schedule | Helps identify borrowed lights, interior glazing, and large openings |
| Interior elevations | Show backing, tile board, wall finishes, and casework conditions |
| Building sections | Help confirm floor-to-floor heights and deck conditions |
| Life safety plans | Identify fire-rated corridors, exits, and separations |
| Specifications | Define materials, finish levels, tolerances, and installation requirements |
| Addenda | Capture drawing changes before final bid submission |
For AI-assisted plan review, Quotr’s guide to AI that reads construction drawings explains how contractors can ask questions directly against a drawing set.
Step 1: Identify Every Wall Type
Start by finding the wall tags or partition tags on the commercial floor plan. These may look like:
- P1
- P2
- A3
- B1
- 1HR
- STC-50
- S1
- 6S
- W1
Each tag should connect to a wall type schedule. The wall type schedule usually defines:
- Stud size
- Stud gauge
- Stud spacing
- Board thickness
- Board type
- Number of drywall layers per side
- Fire rating
- Acoustic rating
- Insulation
- Deflection track
- Wall height
- Special notes
Do not combine all wall footage into one number. A 100-foot standard partition is not the same as a 100-foot one-hour rated wall with two layers of board on each side.
A clean estimate separates quantities by wall type.
Example:
| Wall Type | Description | Estimate Separately? |
|---|---|---|
| P1 | Standard interior partition | Yes |
| P2 | One-hour rated partition | Yes |
| P3 | Sound-rated office wall | Yes |
| P4 | Moisture-resistant restroom wall | Yes |
| S1 | Shaft wall assembly | Yes |
| F1 | Furred wall | Yes |
Step 2: Measure Linear Footage by Wall Type
After identifying the partition types, measure the linear footage of each wall type.
For each wall segment, record:
- Level
- Area or room
- Wall type
- Length
- Height
- Rating
- Notes
Example takeoff table:
| Area | Wall Type | Length | Height | Notes |
|---|---|---|---|---|
| Level 2 Office Area | P1 | 420 LF | 10 FT | Standard partitions |
| Level 2 Corridor | C1 | 180 LF | To deck | One-hour rated |
| Restrooms | P4 | 95 LF | 10 FT | Moisture-resistant board |
| Mechanical Room | P5 | 60 LF | To deck | Fire-rated partition |
This structure makes the estimate easier to review, price, and revise when drawings change.
Step 3: Confirm Wall Heights
Wall height is one of the most common drywall estimating errors.
A wall may stop at:
- Ceiling height
- Underside of structure
- Deck above
- A soffit
- A bulkhead
- A rated head-of-wall condition
- A partial-height condition
Two walls can have the same linear footage but very different drywall and framing quantities.
Example:
- 100 LF wall at 9 FT high = 900 SF per side
- 100 LF wall at 14 FT high = 1,400 SF per side
That difference affects board, studs, track, screws, finish labor, lift requirements, and schedule.
Always confirm wall height using:
- Wall type schedule
- Reflected ceiling plan
- Building sections
- Interior elevations
- Details
- Specifications
Step 4: Calculate Drywall Square Footage
Once wall length and height are confirmed, calculate drywall area.
Formula:
Drywall area = wall length × wall height × number of sides × number of layers
Example 1: Standard partition
- Length: 250 LF
- Height: 10 FT
- Drywall sides: 2
- Layers: 1 each side
Calculation:
250 × 10 × 2 = 5,000 SF of drywall
Example 2: One-hour rated partition
- Length: 250 LF
- Height: 12 FT
- Drywall sides: 2
- Layers: 2 each side
Calculation:
250 × 12 × 2 × 2 = 12,000 SF of drywall
This is why wall type separation matters. The same linear footage can create very different material and labor quantities.
Step 5: Convert Drywall Area Into Sheet Count
Drywall is usually estimated in square footage first, then converted into sheet count based on board size.
Common drywall board sizes:
| Board Size | Square Feet Per Sheet |
|---|---|
| 4 FT × 8 FT | 32 SF |
| 4 FT × 10 FT | 40 SF |
| 4 FT × 12 FT | 48 SF |
| 4 FT × 14 FT | 56 SF |
| 4 FT × 16 FT | 64 SF |
Formula:
Number of sheets = total drywall square footage ÷ square footage per sheet
Example:
- Total drywall area: 5,000 SF
- Board size: 4 FT × 12 FT
- Area per sheet: 48 SF
Calculation:
5,000 ÷ 48 = 104.2 sheets
Add 10% waste:
104.2 × 1.10 = 114.6 sheets
Estimated order quantity:
115 sheets
Board size should be chosen based on wall height, installation strategy, stocking constraints, elevator access, waste, and crew preference.
Step 6: Deduct Openings Carefully
Openings may include:
- Doors
- Windows
- Borrowed lights
- Storefront openings
- Interior glazing
- Access panels
- Large mechanical openings
- Pass-throughs
For small door openings, some estimators do not deduct every opening because the saved board may be offset by additional labor, corner bead, trim, framing, and waste. For large openings, deductions usually matter.
Example:
A 3 FT × 7 FT door opening equals 21 SF per side.
If drywall is on both sides:
21 × 2 = 42 SF deduction
But the opening may also require:
- Jamb studs
- Header track
- Cripple studs
- Reinforcement
- Corner bead
- Additional finishing labor
- Rated frame coordination
The deduction is not the whole scope. Openings reduce board area, but they add framing and labor complexity.
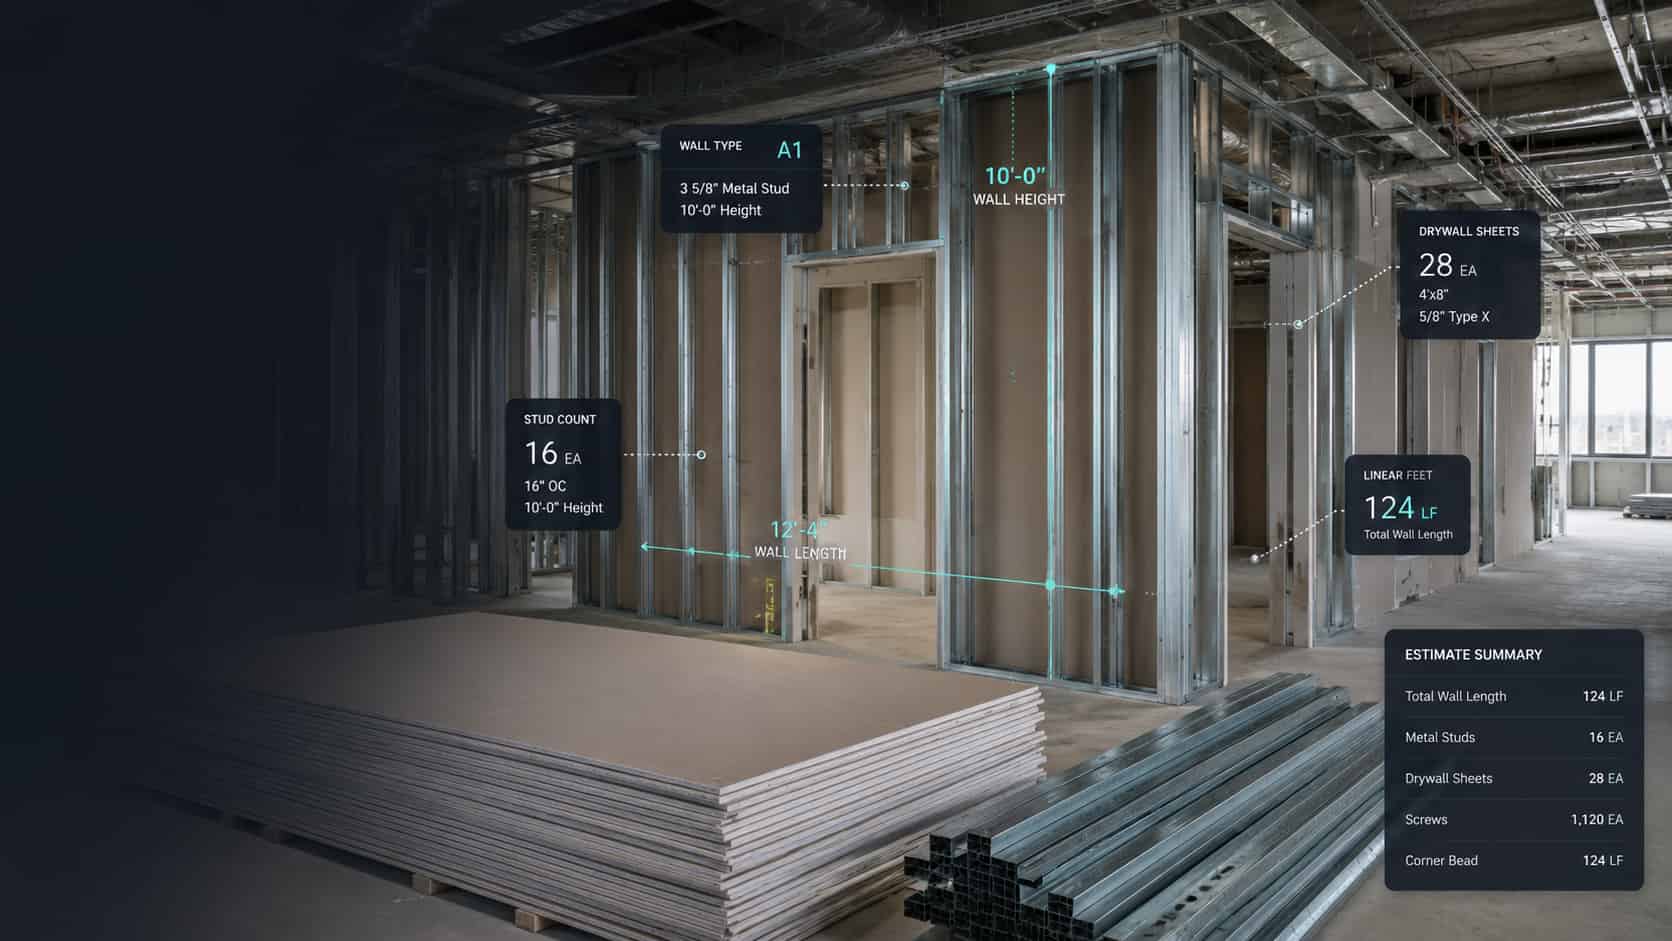
Step 7: Estimate Metal Studs
Commercial interior partitions are often framed with metal studs. The wall type schedule should define stud size, gauge, spacing, and height.
Formula:
Stud count = wall length in inches ÷ stud spacing + 1
Example:
- Wall length: 100 LF
- Convert to inches: 100 × 12 = 1,200 inches
- Stud spacing: 16 inches on center
Calculation:
1,200 ÷ 16 = 75
Add one end stud:
76 studs
Then add extra studs for:
- Corners
- Wall intersections
- Door jambs
- Window jambs
- Openings
- Backing
- Bracing
- High wall conditions
- Fire-rated conditions
- Waste
Example stud estimate:
| Item | Quantity |
|---|---|
| Base stud count | 76 studs |
| Door jamb studs | 12 studs |
| Intersections and corners | 8 studs |
| Waste and extras | 5% |
| Estimated total | 101 studs |
Step 8: Estimate Top Track and Bottom Track
Metal stud walls usually require top and bottom track.
Formula:
Track = wall length × 2
Example:
For a 100 LF wall:
- 100 LF bottom track
- 100 LF top track
- Total: 200 LF of track
If track comes in 10-foot pieces:
200 LF ÷ 10 FT = 20 pieces
Then add track for:
- Openings
- Headers
- Sills
- Deflection track
- Deep leg track
- Slip track
- Fire-rated head-of-wall details
- Soffits
- Bulkheads
- Waste
For commercial work, do not assume track is only top and bottom. The details often add more.
Step 9: Include Framing Around Doors, Windows, and Openings
Openings are one of the most common sources of missed cost in drywall and framing estimates.
For every door or window opening, include:
- Jamb studs
- Header track
- Cripple studs
- Reinforcement
- Clips
- Fasteners
- Backing
- Layout labor
- Corner bead
- Finishing at returns
- Rated opening requirements
Door schedules are especially important. The floor plan may show door location, but the schedule defines width, rating, frame type, and special requirements.
A rated corridor door is not the same as a standard private office door.
Step 10: Add Insulation, Backing, and Accessories
Drywall and framing estimates often miss the materials inside and around the wall.
Common add-ons include:
- Batt insulation
- Acoustic insulation
- Fire safing
- Sound sealant
- Deflection track
- Resilient channel
- Hat channel
- Furring channel
- Z-furring
- Plywood backing
- Heavy-gauge backing
- Toilet accessory backing
- Handrail backing
- TV backing
- Casework backing
- Corner bead
- Control joints
- Reveals
- Access panels
- Shaftwall components
These items may appear in the specifications, elevations, finish plans, and details — not just on the floor plan.
Step 11: Estimate Drywall Finishing Materials
Drywall finishing includes more than hanging board.
Typical finishing materials include:
- Joint tape
- Joint compound
- Screws
- Corner bead
- Trim bead
- Control joint material
- Sealant
- Sanding materials
- Texture, if required
- Primer, if included in scope
The finish level matters. Level 4 and Level 5 finishes should not be priced the same.
Commercial spaces with long corridors, strong lighting, smooth walls, or premium finishes may require more finishing labor and material.
Step 12: Apply Waste Factors
Waste depends on layout, wall height, board size, openings, cuts, damage, and installation strategy.
Common waste factors vary by company and project, but estimators often apply different assumptions for different materials.
| Material | Waste Consideration |
|---|---|
| Drywall board | Cutoffs, openings, damage, layout inefficiency |
| Metal studs | Height cuts, openings, bent material, extras |
| Track | Cuts, headers, overlaps, deflection details |
| Corner bead | Corners, returns, small pieces, damage |
| Joint compound | Finish level, crew method, wall condition |
Avoid applying one blanket waste factor to everything. Board, studs, track, and finishing materials do not waste in the same way.
Step 13: Build the Labor Estimate
Labor depends on the difficulty of the assembly, not just the quantity.
Labor is affected by:
- Wall height
- Board layers
- Board thickness
- Fire rating
- Sound rating
- Finish level
- Access
- Stocking distance
- Floor level
- Crew size
- Schedule compression
- Night work
- Occupied conditions
- Lift requirements
- Number of openings
- Amount of backing
- Inspection requirements
Separate labor by activity:
| Activity | Unit |
|---|---|
| Layout | LF or floor area |
| Metal stud framing | LF or SF |
| Drywall hanging | SF |
| Taping and finishing | SF |
| Insulation | SF |
| Shaftwall assembly | SF or LF |
| Soffits and bulkheads | LF |
| High walls | SF with productivity adjustment |
| Fire-rated detailing | LF or allowance |
For more on pricing work after takeoff, see Quotr’s guide on how to price a construction job.
Step 14: Review Fire-Rated and Sound-Rated Walls
Fire-rated and sound-rated partitions require special attention.
Check:
- Fire rating
- Tested assembly
- Number of board layers
- Board type
- Stud size
- Stud gauge
- Stud spacing
- Insulation
- Sealant
- Head-of-wall condition
- Penetration requirements
- Continuity to deck
- Rated doors and frames
Sound-rated walls may require insulation, acoustic sealant, resilient channel, special board, and careful detailing. Fire-rated walls may require multiple board layers, rated joints, firestopping, and inspection coordination.
Estimate these assemblies separately from standard partitions.
Step 15: Check Scope Gaps Before Finalizing the Bid
Before submitting the estimate, review the drywall and framing scope for missed conditions.
Common missed items include:
- Walls above ceiling
- Full-height rated partitions
- Shaft walls
- Soffits
- Bulkheads
- Furred walls
- Restroom moisture-resistant board
- Tile backer board
- Abuse-resistant board
- Access panels
- Firestopping
- Backing
- Control joints
- Level 5 finish
- High wall equipment
- Stair and elevator core walls
- Addenda changes
- Alternates
- Phasing requirements
- Temporary protection
- Stocking and material handling
This is also where AI-assisted drawing review can help. Quotr’s article on how AI construction estimating works explains how AI can help estimators find scope, quantities, and drawing information faster.
Example: Drywall and Framing Estimate From a Commercial Floor Plan
Assume a tenant improvement project includes:
- 500 LF of standard partitions
- 10 FT wall height
- Drywall on both sides
- One layer each side
- 3-5/8 inch metal studs at 16 inches on center
- 4 FT × 12 FT drywall sheets
- 10% drywall waste
Drywall area:
500 LF × 10 FT × 2 sides = 10,000 SF
Sheet count:
10,000 SF ÷ 48 SF per sheet = 208.3 sheets
Add 10% waste:
208.3 × 1.10 = 229.1 sheets
Estimated drywall order:
230 sheets
Stud count:
500 LF × 12 = 6,000 inches
6,000 ÷ 16 = 375 studs
Add end studs, corners, openings, and waste.
Estimated stud count:
400 to 430 studs, depending on layout and door count.
Track:
500 LF × 2 = 1,000 LF of top and bottom track
Add track for openings, headers, and waste.
Estimated track:
1,050 to 1,150 LF, depending on opening count and details.
This is a simplified example. A real commercial drywall estimate should separate quantities by wall type, height, rating, board layer, and area.
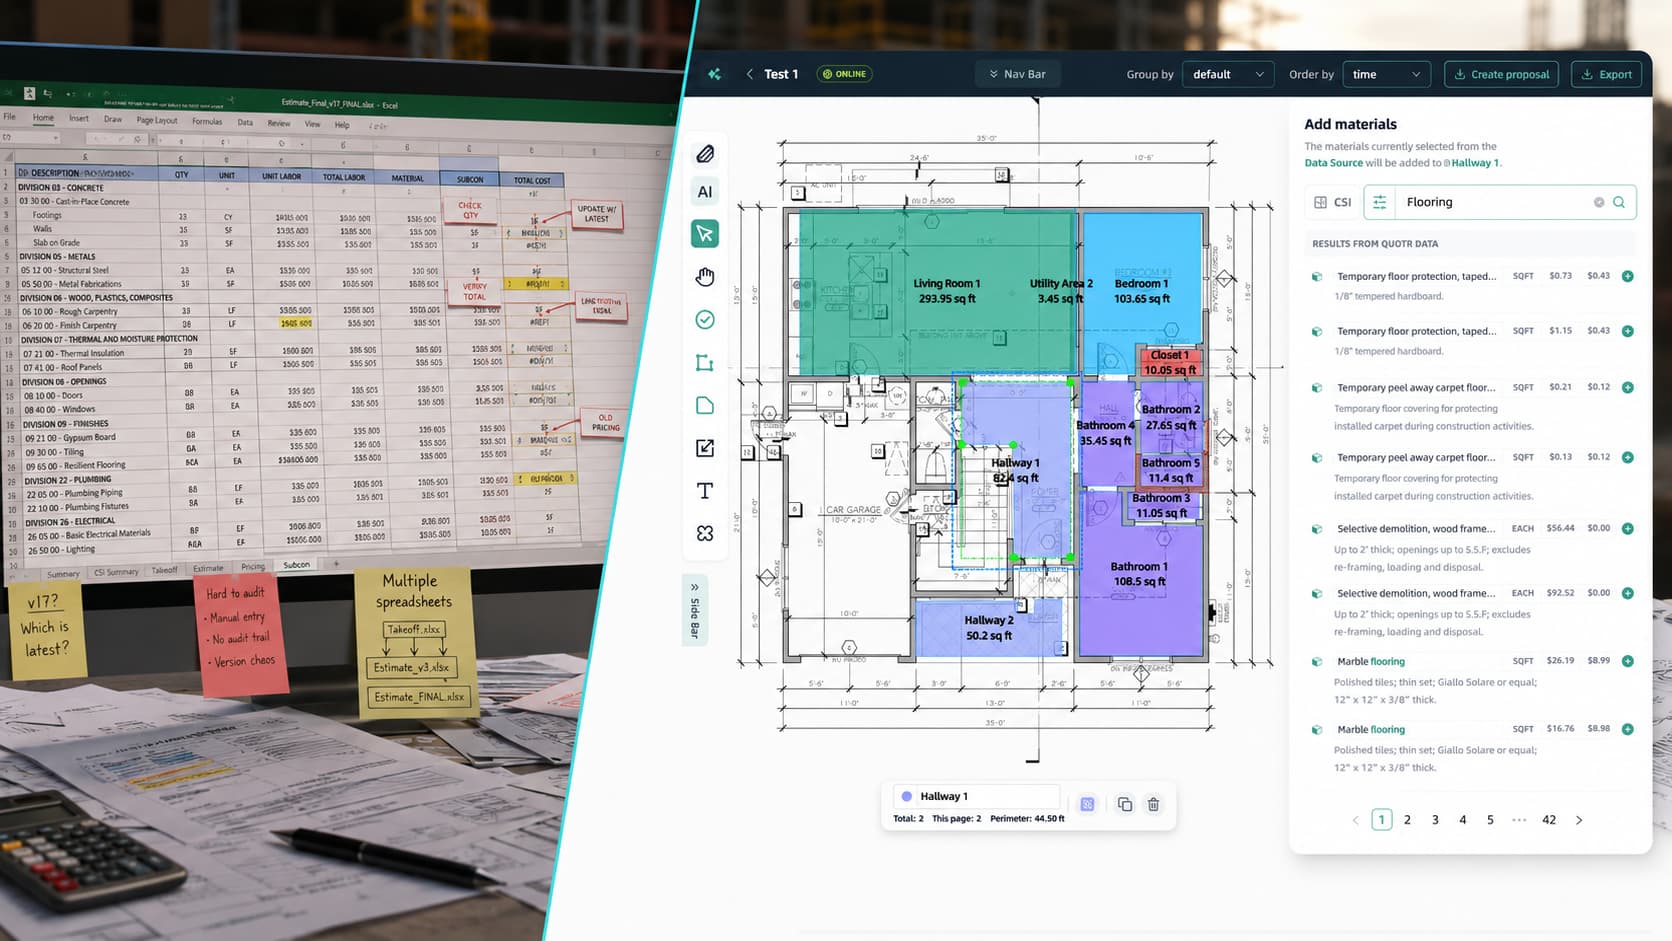
Manual Takeoff vs AI-Assisted Drywall and Framing Takeoff
Traditional drywall estimating requires the estimator to manually trace walls, identify wall types, count openings, calculate board area, and transfer quantities into a spreadsheet or estimating platform.
That process works, but it can be slow and error-prone when drawings change.
AI-assisted estimating helps by reading the drawing set, extracting quantities, organizing wall segments, and letting estimators ask questions about the plans.
With Quotr, teams can ask questions like:
- “How many linear feet of P1 partitions are on Level 2?”
- “Which walls are fire-rated?”
- “Which partitions go to deck?”
- “Which wall types require insulation?”
- “How many doors interrupt the drywall scope?”
- “What changed between the old drawing set and the addendum?”
- “Which sheet defines the wall assemblies?”
That is the difference between a basic digital ruler and an AI preconstruction workflow.
For related workflows, see:
- AI construction estimating software buyer’s guide
- Best AI construction estimating software in 2026
- AI construction estimating software that turns plans into prices in minutes
- Blueprint to priced estimate workflow
How Quotr Helps Estimate Drywall and Framing Faster
Quotr is built for contractors and developers who need to estimate construction work from real drawing sets, not clean textbook examples.
For drywall and framing, Quotr helps teams:
- Read commercial plan sets
- Identify wall and partition information
- Extract quantities from drawings
- Ask questions about blueprints in plain English
- Compare drawing revisions
- Organize takeoff data by scope
- Reduce manual counting and tracing
- Move from drawings to estimate faster
- Support procurement and bid workflows
If your team is still estimating from spreadsheets, see Quotr vs Excel and Quotr vs traditional estimating.
Drywall and Framing Estimating Checklist
Drawing Review
- Floor plans reviewed
- Wall type schedule reviewed
- Reflected ceiling plans reviewed
- Door schedule reviewed
- Window schedule reviewed
- Interior elevations reviewed
- Building sections reviewed
- Life safety plans reviewed
- Specifications reviewed
- Addenda reviewed
Takeoff
- Wall types separated
- Wall heights confirmed
- Linear footage measured
- Drywall area calculated
- Board layers included
- Openings reviewed
- Stud spacing confirmed
- Stud gauge confirmed
- Track calculated
- Doors and windows framed
- Insulation included
- Fire-rated assemblies separated
- Sound-rated assemblies separated
- Soffits and bulkheads included
- Shaft walls included
Pricing
- Drywall board priced
- Metal studs priced
- Track priced
- Screws and fasteners included
- Joint compound included
- Tape included
- Corner bead included
- Control joints included
- Backing included
- Waste included
- Labor production rates checked
- Material handling included
- Equipment included
- Exclusions listed
- Alternates included
Common Mistakes When Estimating Drywall and Framing
Mistake 1: Measuring Walls Without Reading the Wall Schedule
The floor plan shows wall locations. The wall schedule defines the assembly. Estimating from the plan alone can miss board layers, stud sizes, ratings, and insulation.
Mistake 2: Ignoring Wall Height
A 10-foot wall and a deck-height wall should not be priced the same. Always confirm height.
Mistake 3: Forgetting Above-Ceiling Walls
Fire-rated, acoustic, demising, and corridor walls may continue above the ceiling.
Mistake 4: Treating All Drywall as Standard Board
Commercial projects may require moisture-resistant, fire-rated, abuse-resistant, impact-resistant, shaft liner, tile backer, or specialty board.
Mistake 5: Missing Framing Around Openings
Door and window openings require extra framing, not just drywall deductions.
Mistake 6: Forgetting Backing
Casework, toilet accessories, handrails, monitors, equipment, and wall-mounted fixtures often require backing.
Mistake 7: Missing Addenda
Drywall and framing changes often appear in addenda. Always compare the latest drawing set before finalizing the bid.
For more on avoiding estimating errors, see construction estimating mistakes to avoid.
FAQ: Estimating Drywall and Framing on Commercial Floor Plans
How do you calculate drywall square footage from a floor plan?
Measure the linear footage of each wall type, multiply by wall height, then multiply by the number of drywall sides and board layers. For example, a 100 LF wall that is 10 FT high with drywall on both sides equals 2,000 SF of drywall surface area.
How do you estimate metal studs for a commercial wall?
Convert wall length to inches, divide by stud spacing, and add one stud for the end of the wall. Then add extra studs for corners, intersections, openings, backing, bracing, and waste.
Should you subtract doors from drywall takeoff?
It depends. Large openings should usually be deducted, but small door openings may be offset by extra labor, corner bead, framing, waste, and finishing. Many commercial estimators use consistent company rules for deductions.
What is the biggest mistake in drywall estimating?
The biggest mistake is measuring wall lengths without checking wall types, heights, ratings, board layers, and specifications. Commercial drywall estimates must be organized by assembly, not just total square footage.
What drawings are needed for a drywall estimate?
You should review architectural floor plans, wall type schedules, reflected ceiling plans, sections, elevations, door schedules, window schedules, life safety plans, specifications, and addenda.
How much waste should be added to drywall?
Waste depends on board size, layout, openings, cuts, damage, and installation method. Many estimates include a waste allowance, but it should be adjusted by project conditions rather than applied blindly.
Can AI estimate drywall and framing from blueprints?
AI can help read plan sets, extract quantities, identify wall information, compare revisions, and answer drawing questions. Estimators should still review the output, confirm specs, and apply project-specific labor and pricing judgment.
Final Thoughts
Estimating drywall and framing on a commercial floor plan is not just a quantity exercise. It is a drawing interpretation exercise.
The best estimators do not simply measure lines. They connect wall tags to assemblies, assemblies to specs, specs to labor, and labor to real jobsite conditions.
Quotr helps preconstruction teams move faster by using AI to read construction drawings, answer blueprint questions, and turn plan sets into estimating workflows that are easier to review, update, and price.
For contractors bidding high volumes of commercial work, that speed matters. The faster you understand the scope, the faster you can produce a cleaner bid.